AayushTalluris-BSE-Portfolio
This is a template portfolio for the students attending the BlueStamp Engineering program.
Project maintained by atalluri846
Hosted on GitHub Pages — Theme by mattgraham
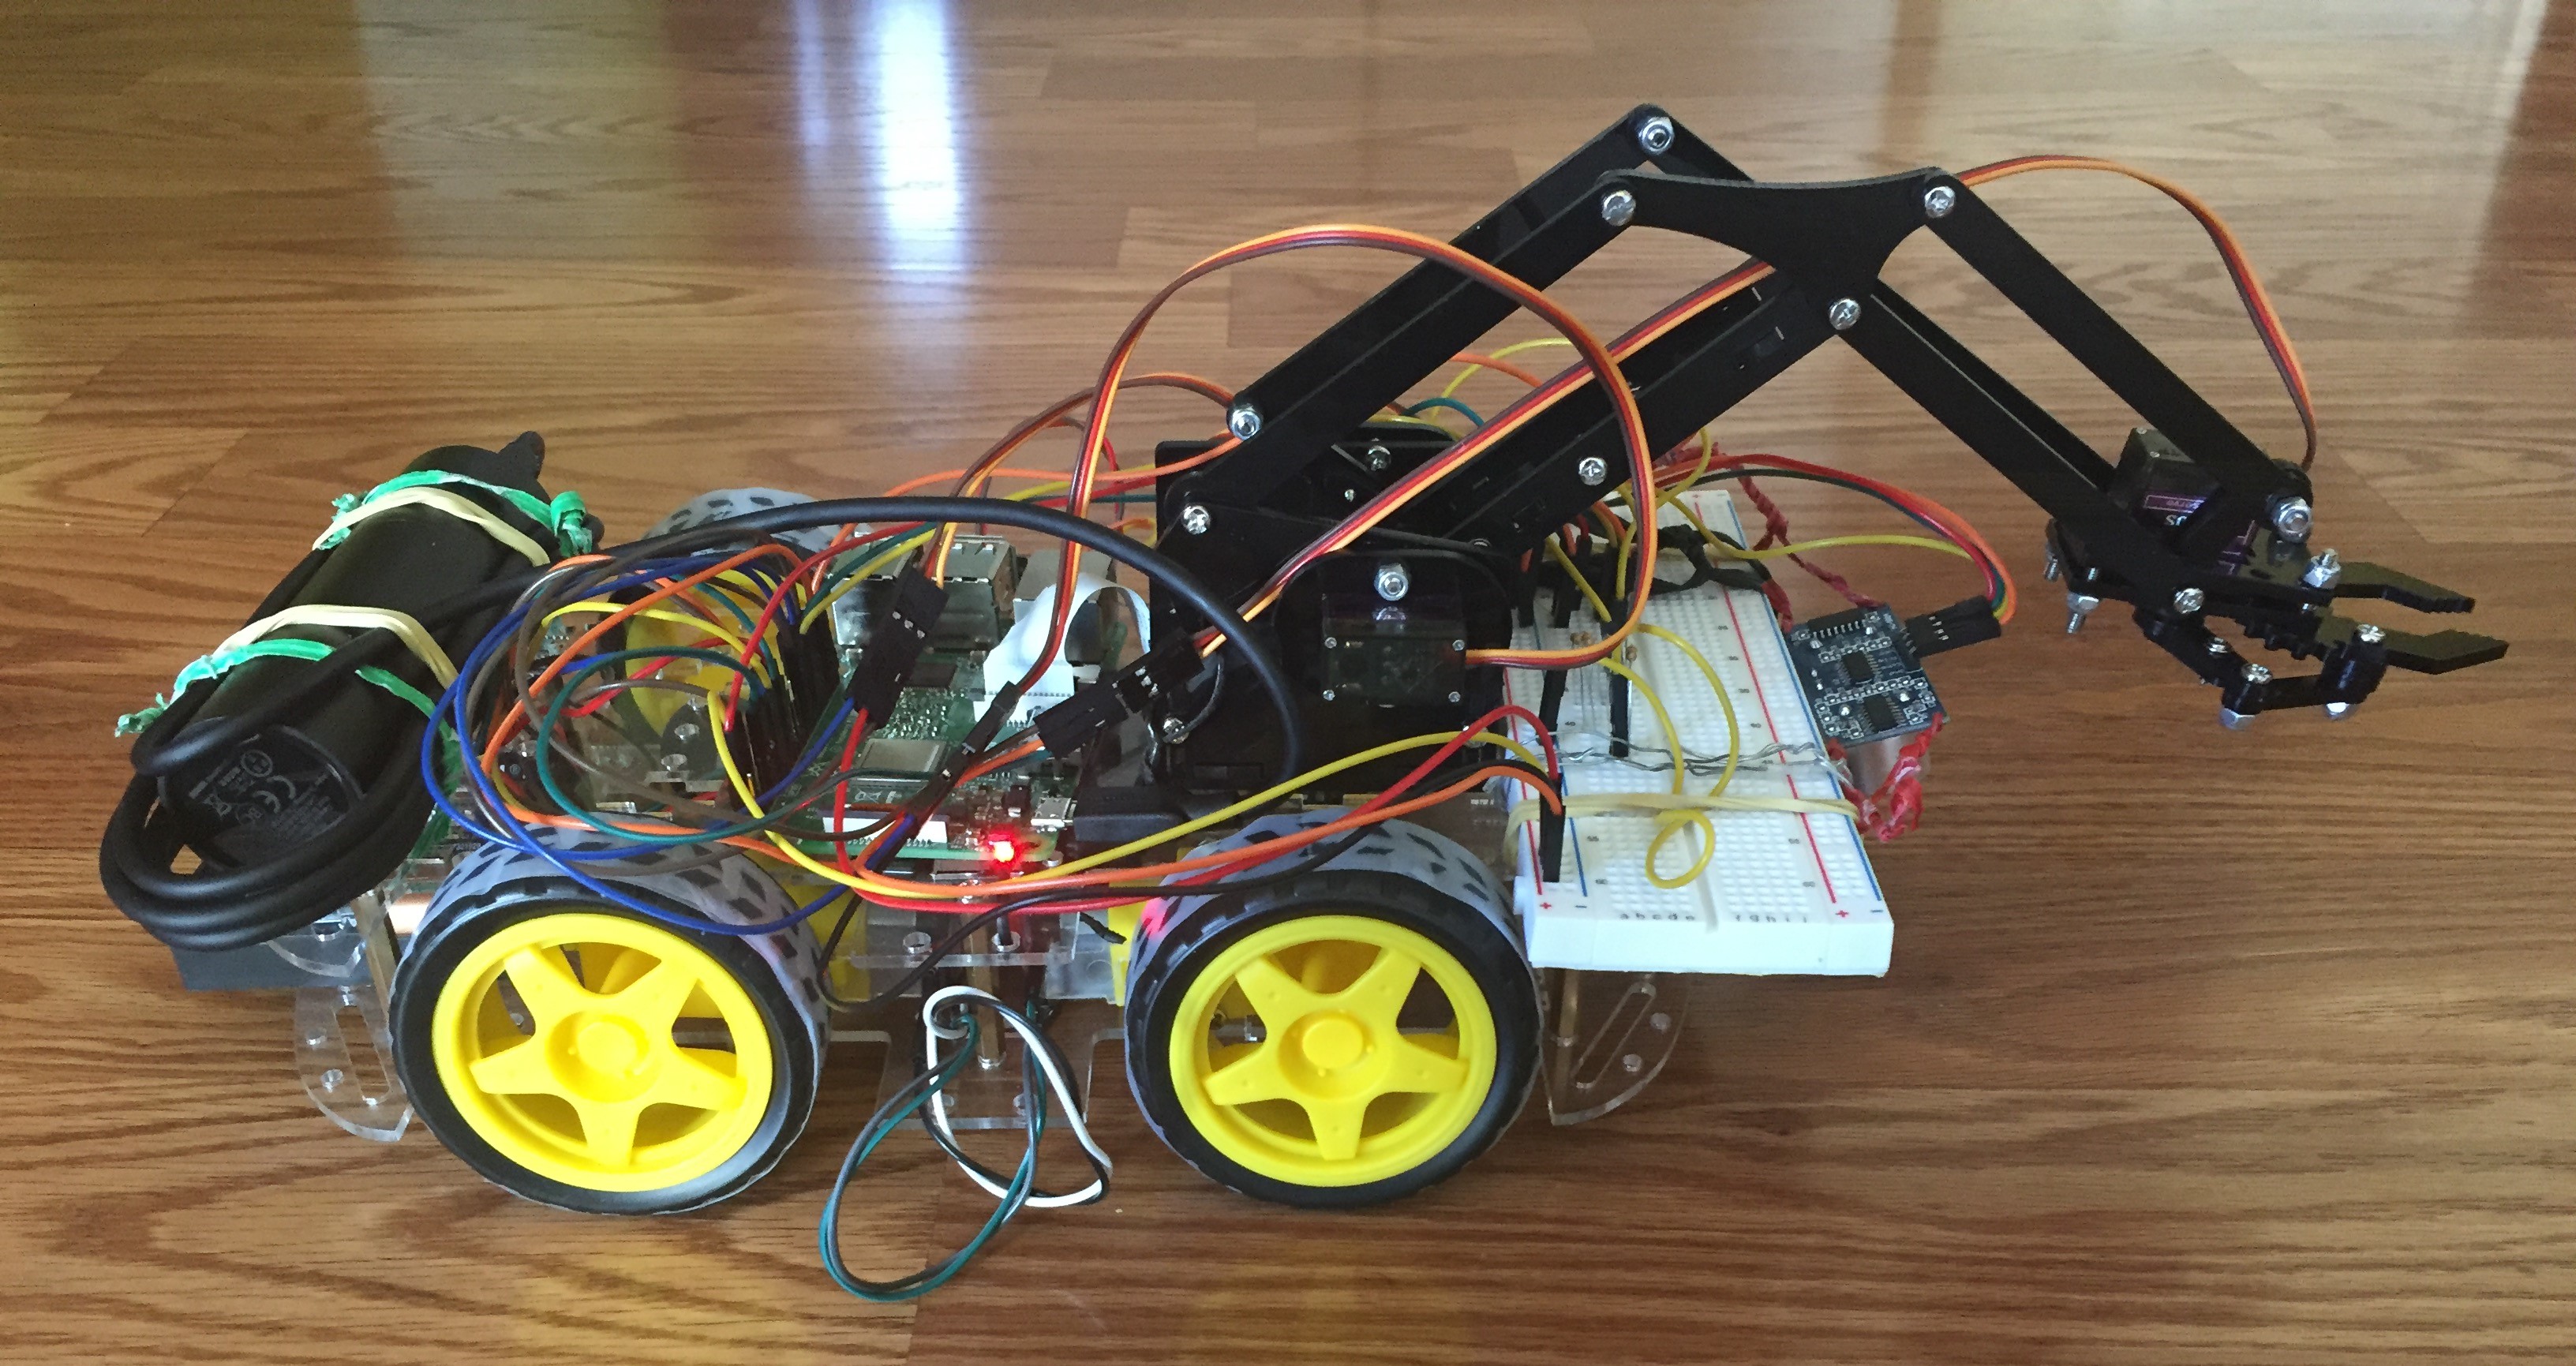
A Ball Tracking Robot With A Claw
My Project is a Raspberry Pi controlled robot that can track and grab a ball. It can detect where the ball is in relation to the robot and move towards it. Afterwards, it can grab the ball and place it in a goal.
| Engineer |
School |
Area of Interest |
Grade |
| Aayush T |
Lynbrook Highschool |
Computer Engineering |
Rising Sophomore |
Presentation
Final Milestone - Grabbing the Ball
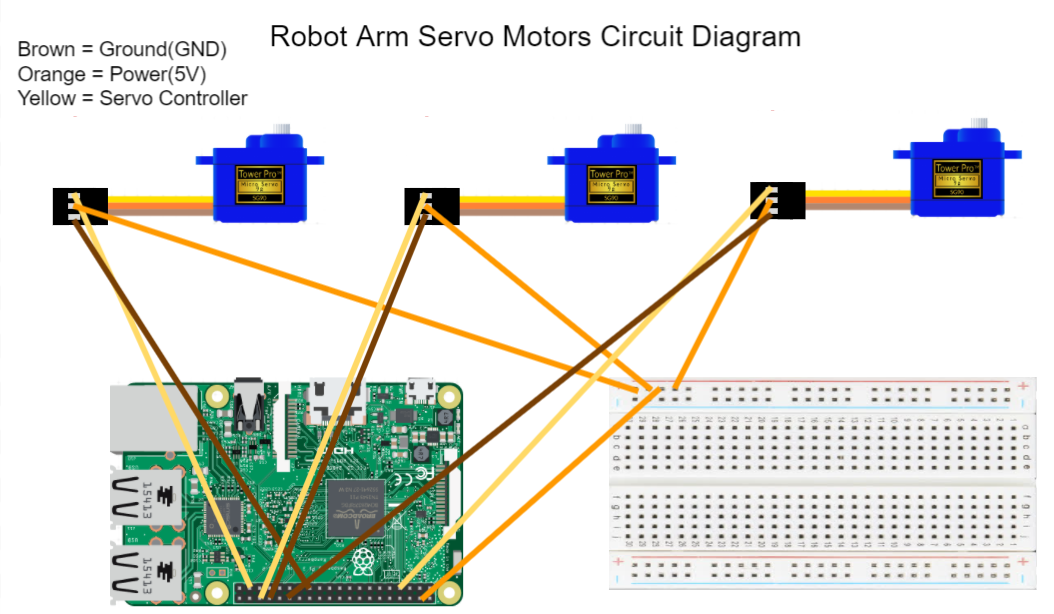
My final milestone added the Robot Arm/Claw to my ball tracking robot. I used the Lafvin Smart Robot Arm Kit and first created the Robot Arm with the Claw and tested it out using the code provided by the Lafvin company. After I made sure it worked I started attaching it to my robot. I took out the bottom half of the Robot Arm/Claw, leaving only three servo motors, and took out the arduino as well. Afterward I used some screws to attach the Robot Arm/Claw to the robot and made sure, if the robot arm moved down it could grab the ball. Afterward, I wired up the servo motors, which controlled the movement of the arm, to the Raspberry Pi, as shown in the image below.
Second Milestone - Tracking the Ball
During my second milestone I setup the ball tracking software for my robot. First, I attatched a camera module to the Raspberry Pi and ran some simple test code to make sure it was capturing the frames correctly. Afterwards, I downloaded the OpenCV software onto my Pi and after some testing I was able to make it detect the color bright red. After some difficult tests and bugs, I was able to have the OpenCV detect the ball and grab the contours and the center of the ball. In order to achieve this I had to use the python library imutils and have it installed on my Pi as well. In order to detect the distance between the robto and the ball I planned on using an Ultrasonic Sensor which I then wired up to the Pi as well. Below is a circuit diagram of how I attatched it to the Pi. After I made sure that the Ultrasonic Sensor was working correctly and gathering the distances in centimeters. I then needed to incorporate the movement of the robot witht the data I collected from the Camera Module and the Ultrasonic Sensor. I was able to have the robot turn right until it noticed the red ball was in the camera frame. It would then slowly move either left or right to center the red ball onto the camera frame and would stop. Finally the robot would move forward in small increments towards the ball and if it went off center it would recenter the robot onto the center of the ball. I need the movements to be precise as I was planning on adding a claw to the front of the robot which needed the ball to be in the exact center of the robot.
Next week I plan on adding the robot arm/claw to the robot and have it grab the ball, detect the goal, and, finally, place the ball into the goal.
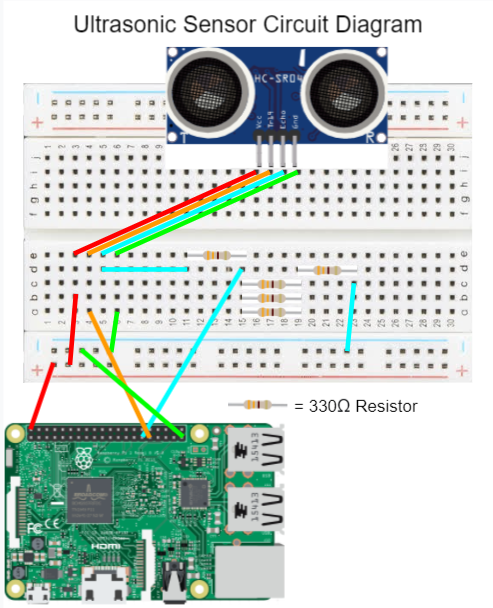
One of the main challenges I faced this week was definetly wiring up the Ultrasonic Sensor to the Raspberry Pi. This is because, in order to operate the Ultrasonic Sensor it needs to have both a 330 and a 440 Ohm resistor as the Ultrasonic Sensor outputs 5 volts but the Raspberry Pi can only take in 3.3 volts. However I only had 330 Ohm resistors and so I needed to use a volatage divider with one 330 ohm resitor and then three 330 Ohm resistors in parallel and one 330 ohm resistor in series which then is connected to ground.
First Milestone - Movement of Robot
My first milestone was setting up and hooking up the Raspberry Pi 3 and the l298n Motor Driver to the Smart Car Chassis. First, I setup the Raspberry Pi 3 by downloading the Raspberry Pi OS (Raspbian) onto a MicroSD card using a Raspberry Pi Imager on my PC. Afterwards, I built the Smart Car Chassis which set the base model for my robot. After I finished the Smart Car Chassis, I wired up the l298n motor driver to the 4 DC motors, attatched the battery pack, and the Raspberry Pi 3 GPIO to the motor driver using some jumper wire. I then started coding for the Motor driver by first making shadow code on my computer using Microsoft Visual Studio in Python. Afterwards, I would transfer the code to Github and copy onto the Pi. Originally, I made some test code to make sure that the DC motors and l298n Motor Driver were wired and working correctly. Afterwards, I imporved my test code and the robot was now able to move forward and backward and able to turn left and right. Since there were four motors I needed to use a tank drive in order to accomplish this. Finally, I made my code run on the Raspberry Pi upon startup which made it easier to run the code as before I needed to plug my Raspberry Pi into the monitor just to start the code.
Next week I plan on adding the Ultrasonic Sensor and the Camera Module to detect the Ball and have the robot move towards the Ball. To accomplish this I will be using OpenCv to detect the color and the general location of the ball.
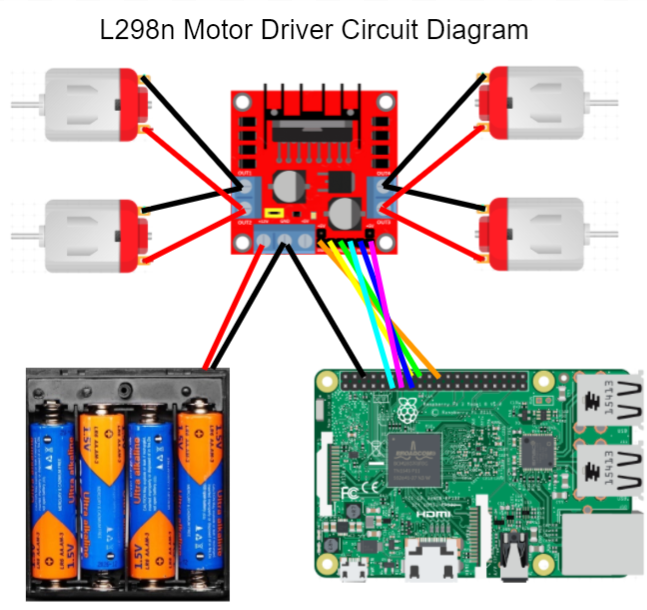
One of the main challenges I faced this week was definetly wiring up the 4 DC Hobby Motors to the l298n motor driver. This is because, I was using a tank drive and making the extra wires fit in the motor driver and also making sure they are in the correct orientation to a lot of testing. There would be times where if I wanted it to move forward it would turn left or right.
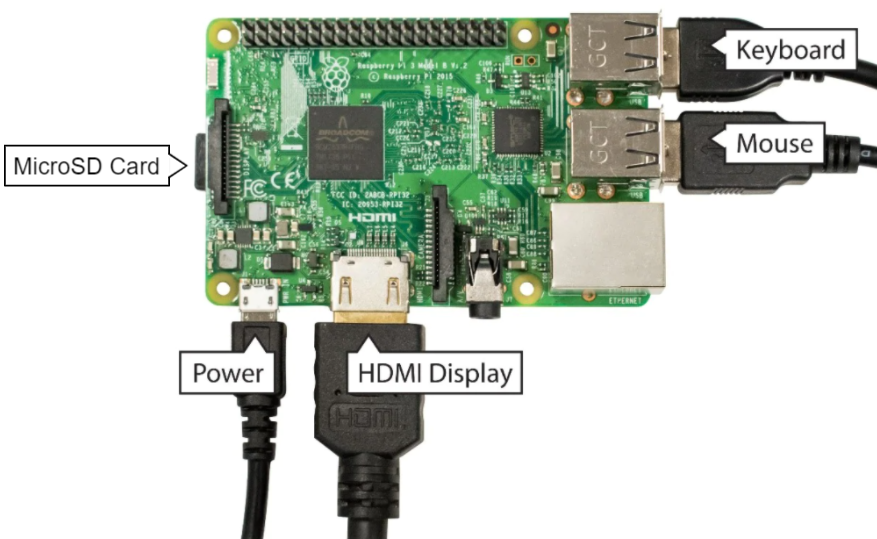
Setting Up the Raspberry Pi
Install the Raspberry Pi Imager onto your computer.
Using the Imager download the Raspberry Pi OS onto a MicroSD card.
Place the MicroSD card into the Raspberry Pi.
Setup your monitor and use a HDMI cable to connect the Pi to the monitor.
Connect your wireless mouse and keyboard into the Raspberry Pi USB ports.
Connect a power source to the Raspberry Pi.
Turn on the monitor and begin the initial configurations.
Reflection
I faced multiple challenges throughout BlueStamp but here are two of the biggest challenges I faced. The first challenge I faced was making sure that everything would fit on the Smart Car Chassis. The Motor Driver, the 4 DC Hobby Motors, the 2 Battery Packs(One for the Raspberry Pi and one for the Motor Driver), the Raspberry Pi, the breadboard with the Ultrasonic Sensor, the camera module, all the jumper wires, and the robot arm were all pretty large and finding a way to put them all in the chassis took multiple hours of planning and strategic placement. The second large challenge I faced was with OpenCV. I was completely new to the software and finding out how to detect the color, the ball, and then the contours of the ball as well as the center took days of me trying to code and fixing bugs. Although I faced muliple challenges, it gave me new insights on how it is like to be an engineer and caused me to love the engineering process even more. I enjoyed both the hardware and software components and the process of trouble-shooting and beeing able to think up of out-of-the-box solutions. Additionally, after I finished my base project, seeing my vision come to life was an overwhelming feeling.
Code
Click to expand!
```python
import RPi.GPIO as GPIO
import cv2
import numpy as np
import time
import imutils
in1 = 24
in2 = 23
ena = 25
in3 = 17
in4 = 22
enb = 27
GPIO_TRIGGER = 6
GPIO_ECHO = 5
GPIO.setmode(GPIO.BCM)
GPIO.setup(in1,GPIO.OUT)
GPIO.setup(in2,GPIO.OUT)
GPIO.setup(ena,GPIO.OUT)
GPIO.setup(in3,GPIO.OUT)
GPIO.setup(in4,GPIO.OUT)
GPIO.setup(enb,GPIO.OUT)
GPIO.output(in1,GPIO.LOW)
GPIO.output(in2,GPIO.LOW)
GPIO.output(in3,GPIO.LOW)
GPIO.output(in4,GPIO.LOW)
pa=GPIO.PWM(ena,1000)
pb=GPIO.PWM(enb,1000)
GPIO.setup(GPIO_TRIGGER, GPIO.OUT)
GPIO.setup(GPIO_ECHO, GPIO.IN)
pa.start(80)
pb.start(80)
vs = cv2.VideoCapture(0)
Lower = (164, 196, 80)
Upper = (179, 255, 219)
center = None
done = False
time.sleep(2.0)
while(1):
GPIO.output(in1,GPIO.HIGH)
GPIO.output(in2,GPIO.LOW)
GPIO.output(in3,GPIO.LOW)
GPIO.output(in4,GPIO.HIGH)
time.sleep(0.500)
GPIO.output(in1,GPIO.LOW)
GPIO.output(in2,GPIO.LOW)
GPIO.output(in3,GPIO.LOW)
GPIO.output(in4,GPIO.LOW)
n=6
for i in range(n):
_, frame = vs.read()
if frame is None:
break
blurred = cv2.GaussianBlur(frame, (11, 11), 0)
width, height = frame.shape[:2]
hsv = cv2.cvtColor(blurred, cv2.COLOR_BGR2HSV)
mask = cv2.inRange(hsv, Lower, Upper)
mask = cv2.erode(mask, None, iterations=2)
mask = cv2.dilate(mask, None, iterations=2)
cnts = cv2.findContours(mask.copy(), cv2.RETR_EXTERNAL,
cv2.CHAIN_APPROX_SIMPLE)
cnts = imutils.grab_contours(cnts)
center = None
if len(cnts) > 0:
c = max(cnts, key=cv2.contourArea)
((x, y), radius) = cv2.minEnclosingCircle(c)
M = cv2.moments(c)
center = (int(M["m10"] / M["m00"]), int(M["m01"] / M["m00"]))
done = True
break
time.sleep(0.1)
if done:
break
done = False
for i in range(11):
_, frame = vs.read()
if frame is None:
break
blurred = cv2.GaussianBlur(frame, (11, 11), 0)
width, height = frame.shape[:2]
hsv = cv2.cvtColor(blurred, cv2.COLOR_BGR2HSV)
mask = cv2.inRange(hsv, Lower, Upper)
mask = cv2.erode(mask, None, iterations=2)
mask = cv2.dilate(mask, None, iterations=2)
cnts = cv2.findContours(mask.copy(), cv2.RETR_EXTERNAL,
cv2.CHAIN_APPROX_SIMPLE)
cnts = imutils.grab_contours(cnts)
center = None
if len(cnts) > 0:
c = max(cnts, key=cv2.contourArea)
((x, y), radius) = cv2.minEnclosingCircle(c)
M = cv2.moments(c)
center = (int(M["m10"] / M["m00"]), int(M["m01"] / M["m00"]))
if center[0]<300:
while(1):
GPIO.output(in1,GPIO.LOW)
GPIO.output(in2,GPIO.HIGH)
GPIO.output(in3,GPIO.HIGH)
GPIO.output(in4,GPIO.LOW)
time.sleep(0.150)
GPIO.output(in1,GPIO.LOW)
GPIO.output(in2,GPIO.LOW)
GPIO.output(in3,GPIO.LOW)
GPIO.output(in4,GPIO.LOW)
n=11
for i in range(n):
_, frame = vs.read()
if frame is None:
break
blurred = cv2.GaussianBlur(frame, (11, 11), 0)
width, height = frame.shape[:2]
hsv = cv2.cvtColor(blurred, cv2.COLOR_BGR2HSV)
mask = cv2.inRange(hsv, Lower, Upper)
mask = cv2.erode(mask, None, iterations=2)
mask = cv2.dilate(mask, None, iterations=2)
cnts = cv2.findContours(mask.copy(), cv2.RETR_EXTERNAL,
cv2.CHAIN_APPROX_SIMPLE)
cnts = imutils.grab_contours(cnts)
center = None
if len(cnts) > 0:
c = max(cnts, key=cv2.contourArea)
((x, y), radius) = cv2.minEnclosingCircle(c)
M = cv2.moments(c)
center = (int(M["m10"] / M["m00"]), int(M["m01"] / M["m00"]))
if center[0]>300 and center[0]<340:
done = True
break
time.sleep(0.5)
if done:
break
elif center[0]>340:
while(1):
GPIO.output(in1,GPIO.HIGH)
GPIO.output(in2,GPIO.LOW)
GPIO.output(in3,GPIO.LOW)
GPIO.output(in4,GPIO.HIGH)
time.sleep(0.150)
GPIO.output(in1,GPIO.LOW)
GPIO.output(in2,GPIO.LOW)
GPIO.output(in3,GPIO.LOW)
GPIO.output(in4,GPIO.LOW)
n=11
for i in range(n):
_, frame = vs.read()
if frame is None:
break
blurred = cv2.GaussianBlur(frame, (11, 11), 0)
width, height = frame.shape[:2]
hsv = cv2.cvtColor(blurred, cv2.COLOR_BGR2HSV)
mask = cv2.inRange(hsv, Lower, Upper)
mask = cv2.erode(mask, None, iterations=2)
mask = cv2.dilate(mask, None, iterations=2)
cnts = cv2.findContours(mask.copy(), cv2.RETR_EXTERNAL,
cv2.CHAIN_APPROX_SIMPLE)
cnts = imutils.grab_contours(cnts)
center = None
if len(cnts) > 0:
c = max(cnts, key=cv2.contourArea)
((x, y), radius) = cv2.minEnclosingCircle(c)
M = cv2.moments(c)
center = (int(M["m10"] / M["m00"]), int(M["m01"] / M["m00"]))
if center[0]>300 and center[0]<340:
done = True
break
time.sleep(0.5)
if done:
break
GPIO.output(in1,GPIO.LOW)
GPIO.output(in2,GPIO.LOW)
GPIO.output(in3,GPIO.LOW)
GPIO.output(in4,GPIO.LOW)
def distance():
GPIO.output(GPIO_TRIGGER, True)
time.sleep(0.00001)
GPIO.output(GPIO_TRIGGER, False)
StartTime = time.time()
StopTime = time.time()
while GPIO.input(GPIO_ECHO) == 0:
StartTime = time.time()
while GPIO.input(GPIO_ECHO) == 1:
StopTime = time.time()
TimeElapsed = StopTime - StartTime
distance = (TimeElapsed * 34300)/2
return distance
def checkcenter():
for i in range(6):
_, frame = vs.read()
if frame is None:
break
blurred = cv2.GaussianBlur(frame, (11, 11), 0)
width, height = frame.shape[:2]
hsv = cv2.cvtColor(blurred, cv2.COLOR_BGR2HSV)
mask = cv2.inRange(hsv, Lower, Upper)
mask = cv2.erode(mask, None, iterations=2)
mask = cv2.dilate(mask, None, iterations=2)
cnts = cv2.findContours(mask.copy(), cv2.RETR_EXTERNAL,
cv2.CHAIN_APPROX_SIMPLE)
cnts = imutils.grab_contours(cnts)
center = None
if len(cnts) > 0:
c = max(cnts, key=cv2.contourArea)
((x, y), radius) = cv2.minEnclosingCircle(c)
M = cv2.moments(c)
center = (int(M["m10"] / M["m00"]), int(M["m01"] / M["m00"]))
if center[0]>300 and center[0]<340:
return False
return recenter(center)
def recenter(center):
done=False
if center[0]<300:
while(1):
dista = distance()
if dista>=100.0 or dista<=5.0:
return True
GPIO.output(in1,GPIO.LOW)
GPIO.output(in2,GPIO.HIGH)
GPIO.output(in3,GPIO.HIGH)
GPIO.output(in4,GPIO.LOW)
time.sleep(0.150)
GPIO.output(in1,GPIO.LOW)
GPIO.output(in2,GPIO.LOW)
GPIO.output(in3,GPIO.LOW)
GPIO.output(in4,GPIO.LOW)
n=11
for i in range(n):
_, frame = vs.read()
if frame is None:
break
blurred = cv2.GaussianBlur(frame, (11, 11), 0)
width, height = frame.shape[:2]
hsv = cv2.cvtColor(blurred, cv2.COLOR_BGR2HSV)
mask = cv2.inRange(hsv, Lower, Upper)
mask = cv2.erode(mask, None, iterations=2)
mask = cv2.dilate(mask, None, iterations=2)
cnts = cv2.findContours(mask.copy(), cv2.RETR_EXTERNAL,
cv2.CHAIN_APPROX_SIMPLE)
cnts = imutils.grab_contours(cnts)
center = None
if len(cnts) > 0:
c = max(cnts, key=cv2.contourArea)
((x, y), radius) = cv2.minEnclosingCircle(c)
M = cv2.moments(c)
center = (int(M["m10"] / M["m00"]), int(M["m01"] / M["m00"]))
if center[0]>300 and center[0]<340:
done = True
break
time.sleep(0.5)
if done:
return False
elif center[0]>340:
while(1):
dista = distance()
if dista>=100.0 or dista<=5.0:
return True
GPIO.output(in1,GPIO.HIGH)
GPIO.output(in2,GPIO.LOW)
GPIO.output(in3,GPIO.LOW)
GPIO.output(in4,GPIO.HIGH)
time.sleep(0.150)
GPIO.output(in1,GPIO.LOW)
GPIO.output(in2,GPIO.LOW)
GPIO.output(in3,GPIO.LOW)
GPIO.output(in4,GPIO.LOW)
n=11
for i in range(n):
_, frame = vs.read()
if frame is None:
break
blurred = cv2.GaussianBlur(frame, (11, 11), 0)
width, height = frame.shape[:2]
hsv = cv2.cvtColor(blurred, cv2.COLOR_BGR2HSV)
mask = cv2.inRange(hsv, Lower, Upper)
mask = cv2.erode(mask, None, iterations=2)
mask = cv2.dilate(mask, None, iterations=2)
cnts = cv2.findContours(mask.copy(), cv2.RETR_EXTERNAL,
cv2.CHAIN_APPROX_SIMPLE)
cnts = imutils.grab_contours(cnts)
center = None
if len(cnts) > 0:
c = max(cnts, key=cv2.contourArea)
((x, y), radius) = cv2.minEnclosingCircle(c)
M = cv2.moments(c)
center = (int(M["m10"] / M["m00"]), int(M["m01"] / M["m00"]))
if center[0]>300 and center[0]<340:
done = True
break
time.sleep(0.5)
if done:
return False
while(1):
GPIO.output(in1,GPIO.HIGH)
GPIO.output(in2,GPIO.LOW)
GPIO.output(in3,GPIO.HIGH)
GPIO.output(in4,GPIO.LOW)
time.sleep(0.15)
GPIO.output(in1,GPIO.LOW)
GPIO.output(in2,GPIO.LOW)
GPIO.output(in3,GPIO.LOW)
GPIO.output(in4,GPIO.LOW)
if checkcenter():
break
dist = distance()
if dist>=100.0 or dist<=5.0:
GPIO.output(in1,GPIO.LOW)
GPIO.output(in2,GPIO.LOW)
GPIO.output(in3,GPIO.LOW)
GPIO.output(in4,GPIO.LOW)
break
time.sleep(0.5)
GPIO.cleanup()
```